Pages

Tuesday, February 3, 2015

I Became A BeachBody Coach!

The decision to become a beachbody coach was not an easy one. I love their workouts and meal plans but the idea of putting myself out there and, in my mind, being responsible for others success made me nervous. I also wasn't sure I would have enough time to dedicate to the business. In short, I was on the fence!

Then I posted a picture to my instagram. This one in fact.


I posted the picture letting my friends and the #instafit world know that I was starting piyo the next day and I was excited. I got a bunch of likes...which is always nice ha! But, what struck me was a stranger's comment. He was the third or fourth person to ask me if I was a coach. I told him my coach thought I'd be good at it and had encouraged me to join, but I was scared.

Putting yourself out there is scary, especially for an introvert like myself. I knew if I did this, I would want to put my all into it and I wasn't sure if I was up to the task. I'm not in the shape I want to be yet; I'm still on my journey, and if I'm honest with myself, at the beginning of that journey. How could I, Ms. Still Overweight and stumbling through her workouts, be a good coach to someone else?

Pondering that question is what made me realize my struggles are what would make me relatable. I understand the struggle of not going for the ice cream when you have a craving or forcing yourself out of bed an hour before you want to get up. I understand it's not easy and it's a learning process. Instead of being a coach that's already reached her goals and is in the best shape asking people to do the same, I'll be the one who's huffing and puffing along with everyone...the one who can enjoy the victory at the end because I was a part along the way, not just someone who stood on the outside telling everyone how to do it.

While I'm still nervous, it's a good nervous. It's one that will allow me to help others become the best version of themselves!

Thursday, September 19, 2013

49er's Game!!

I can't exactly say I'm a football fan. I don't have a team that I cheer for religiously nor do I watch it on TV. However, I live close to San Francisco and I want to say I've been to an NFL game. It's kind of a dumb reason to go to a football game; I know! But, that's really the only reason I want to go. HA!! 

I told my sister-in-law Denise I really wanted to go to a game, and she did too, so we have started our planning! We have the tickets; now all that's left is to get properly geared up! Ok...so maybe shopping had something to do with wanting to go to the game. HaHa!!

So far, I only have a few things. My favorite by far and one that I HAD to model around my office for everyone to see...mind you, I work in the corporate office of a property management company...is my Mohawk Hat! EEEEEK...I'm so stinking excited about it!!!!


Yes, I was sitting at my desk at work and took that picture...AND put it on Instagram and Facebook. Don't judge me! HAHA!

We both decided we were going to wear 49er earrings and use nail decals on our fingers. We haven't practiced with the nail polish, but I'm going to try and remember to take pictures while we do it and make it a blog post.


The last piece we have is very special. Denise found a scarf picture on Pinterest that we both really liked. Only problem...neither one of us can crochet! 


But problem solved! Mama's gonna make it for us! My mom seriously rocks!! She's a diehard Steelers fan and she's going to make not one, but TWO 49er scarves! Gotta love Mama!

I'm sure over time we'll get more gear for our game since it's not for a few more months. But so far, I think we've got a good start! 

<3 Ash
 

Tuesday, September 17, 2013

Baked Chicken Tenders

Who doesn't love chicken tenders?! I mean seriously...what's not to love about them?!?! I could probably eat them everyday and not get tired of them. However, I'm already let's say, not the smallest chick around, so I don't think my jeans could handle fried chicken tenders everyday...or once a week for that matter. HaHa! 

So, because of my love of these scrumptious little morsels, I decided there must be a better way to make them. It took some trial and error to get them crunchy while baked in the oven, but I think I may have cracked the code.

What you're gonna need:

-Chicken tenders or chicken breasts cut into strips
-3-4 eggs
-Flour
-Panko bread crumbs
-Olive oil
-Salt & Pepper
-4 dishes (I used foil pie pans from the dollar store.)


Try to set yourself up as best you can to make the coating process quick and easy. I have a VERY small kitchen, so I tend to use my cutting boards over my sink when I need extra room. In fact, that's what I did for the baking sheet so it was right next to my breading station. I use a double coating method for the chicken to get that crunchy texture.
 
1st dish: 1 egg beaten w/salt & pepper
2nd dish: 1-2 cups of flour
3rd dish: 2 eggs beaten 
4th dish: Panko bread crumbs 


Start by putting one or two pieces of chicken into the first dish of beaten egg. Make sure both sides are coated in the egg mixture.


Then let the extra egg drip off for a few seconds before you put it into the flour dish. Coat both sides with the flour.


Gently shake off the excess flour then put it in the second dish of beaten eggs. It's very important to make sure all the flour is covered with egg otherwise the panko won't stick in the next step.


Now, the final dish...panko! I tend to put the chicken piece in the dish then cover it with panko and press it in. Flip it over and do this again. Then put it on an ungreased baking sheet and drizzle olive oil on top so they brown nicely.


Bake at 425 degrees for about 15 minutes. I like to flip them halfway through so they get browned evenly. 


Also, I have found that my oven doesn't always reach the temperature I set it on. I never had this problem with electric ovens, but I now have a gas one and it's very random. lol So, I got an oven thermometer from Bed Bath & Beyond that hangs in my oven and tells me what temperature it actually is. I've always been a decent cook, so when I started using this oven and nothing was turning out right I got really frustrated, but this has helped tremendously. Best $5.99 investment I've ever made!!


If you're going to freeze these, you will need to cool them completely. You can freeze them before you cook them also, but I like to have them already cooked so I can just pop them into the microwave on days I'm feeling lazy! 

I cool mine on wire racks so they don't go soggy. 

 
If you plan on freezing before cooking, place them on the baking sheet and put that in the freezer. Once they're completely frozen, you can put them into a freezer bag.

Enjoy! 

<3 Ash


Sunday, September 15, 2013

Fun..Family..& Orlando!!!

A few weeks ago, all my cousins, my parents, aunts, & grandma made our way out to Orlando. One of my cousins got married and for the first time, everyone was able to come to a family event. We've definitely tried in the past, but let's face it...life gets crazy and shit happens! Two of us (myself being one of them) live on the west coast while the rest of my cousins live on the east coast, so getting all of us together is a major challenge! But we managed it!!

I decided early on not to take a day flight. I didn't have many days out in Orlando to see all my family, so I didn't want to waste an entire day sitting on an airplane. So, I hopped on a red eye!


While my theory of taking a red eye to not waste precious time was a good one...and one I'll continue to follow whenever I can...there was one problem. I CAN'T SLEEP ON PLANES! I knew this going in...but O.M.G. I was sooo tired when I got to Florida! I had only got about 3 hours of sleep the night before because of all my excitement, and I didn't sleep a wink on the plane! I basically worked with only a few hours of sleep a night the entire time I was out there because everyone in my family was on east coast time so they were all 3 hours ahead of me. It was worth it though.

My cousin Jeff, had a beautiful wedding. He's one of those guys who's SUPER quiet and rarely shows his sense of humor. He had his moment though. :) There was a collective chuckle when they kneeled down at the alter.


It was so awesome to see all my cousins again. There were some I hadn't seen in over 13 years!! Time goes so fast!! I love that we were able to all gather around my grandma and take a bunch of photos along with a few of her great-grand kids. 


And of course, with my family, a special event is never complete without a few shenanigans! Gotta love Jessie's photo bomb!!


<3 Ash

Sunday, September 8, 2013

Mexican Chicken

Mexican Chicken


This chicken recipe is really a starter for several other recipes I make...quesadillas, tacos, enchiladas, really anything "Mexican" that you can add chicken to. It's also great with plain white or brown rice.

It's basic, it's yummy, it's quick, and best of all, it's FAST & EASY!!

What you need:


-Chicken 
-Taco Seasoning
-Oil
-Skillet

Start by sprinkling the taco seasoning on both sides of the chicken breasts. (As a side note: I use a plastic cutting board when doing anything with chicken, so I can put it in the dishwasher and sanitize it. Better to be safe than sorry!)


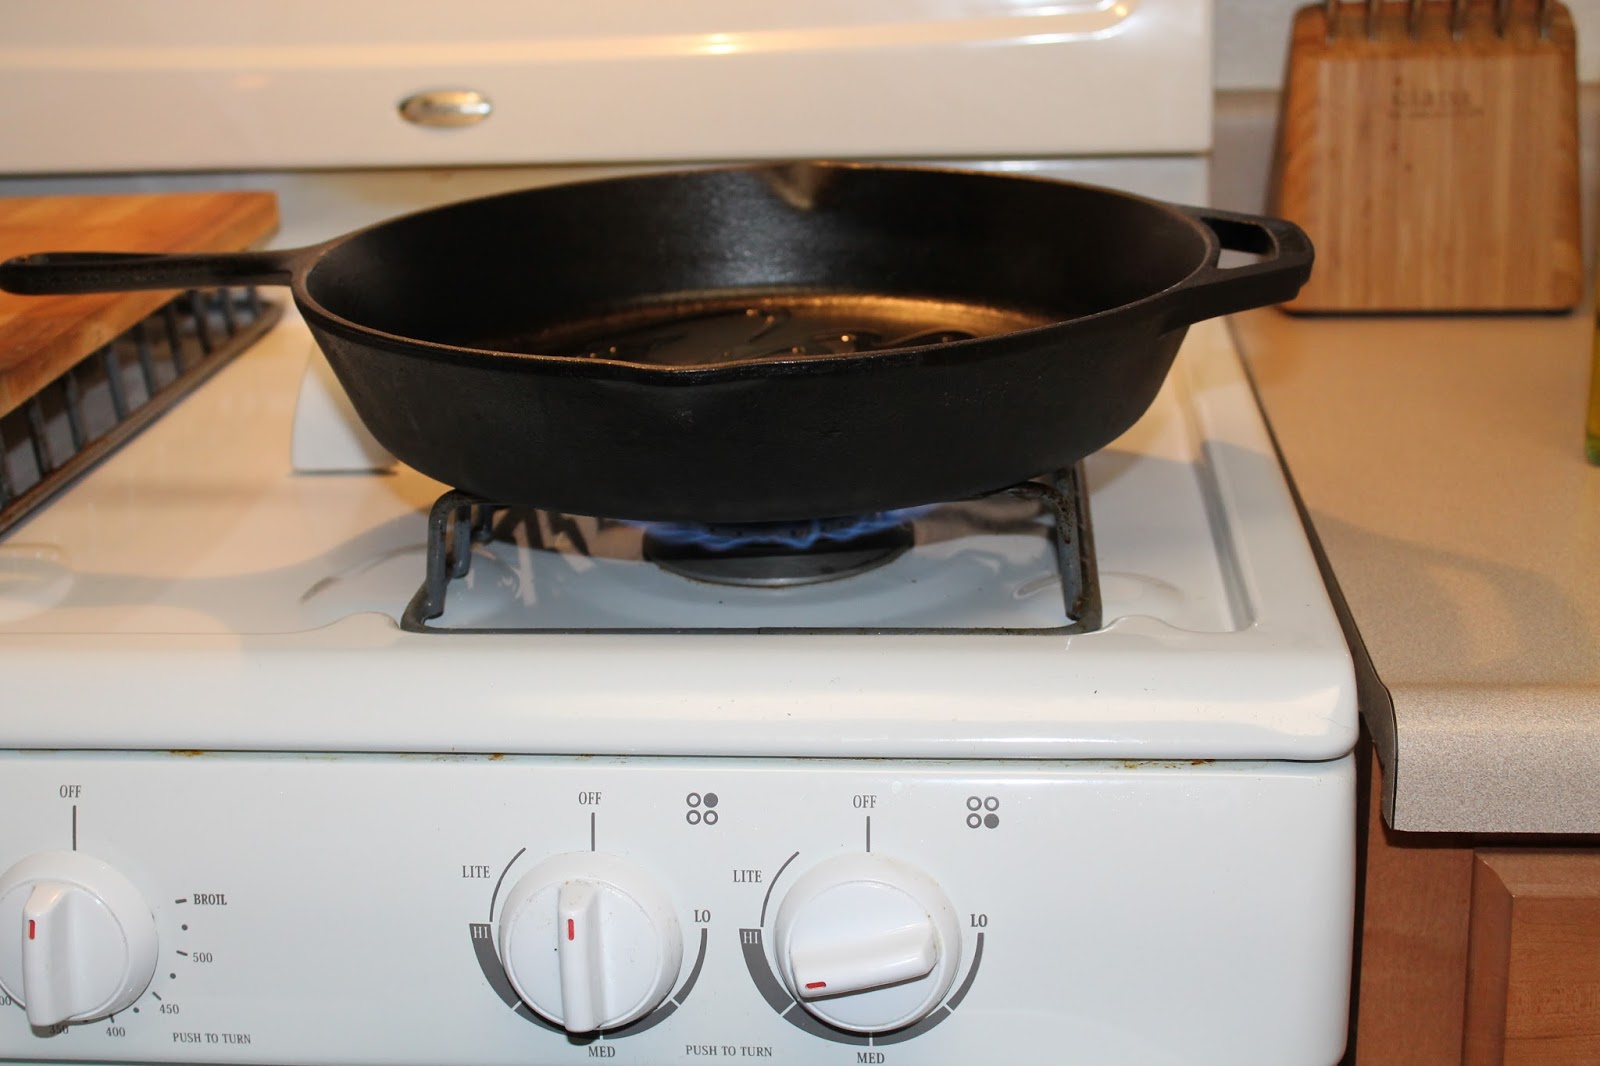
Then put a small amount oil in your pan and heat it over medium high heat. I use a cast iron skillet because it distributes the heat more evenly, but you can use a regular skillet and it works just fine.


Once the oil is hot, add the chicken. The chicken should cook about 5-6 minutes per side if it's fairly thin, but it can take longer depending on how thick the chicken pieces are. If you're not sure the chicken's done all the way through, cut into the thickest part and make sure there's no pink left.


Now it's just a matter of what I want to use my chicken for. A lot of times, I'll make this in bulk then freeze it. When I'm in the mood for Mexican, everything's pretty much done! 

This really seems too easy to call a "recipe", but for as simple as it is, it packs big flavor. Chicken is a staple in my house and let's be real...chicken can be REALLY boring! Which is how this "recipe" was born. 

Shred it and put it in tacos, or cube it and put it between two tortillas with some cheese in a skillet and presto! you have an amazing quesadilla! 

It's a great start to endless possibilities! 

Halloween Candles

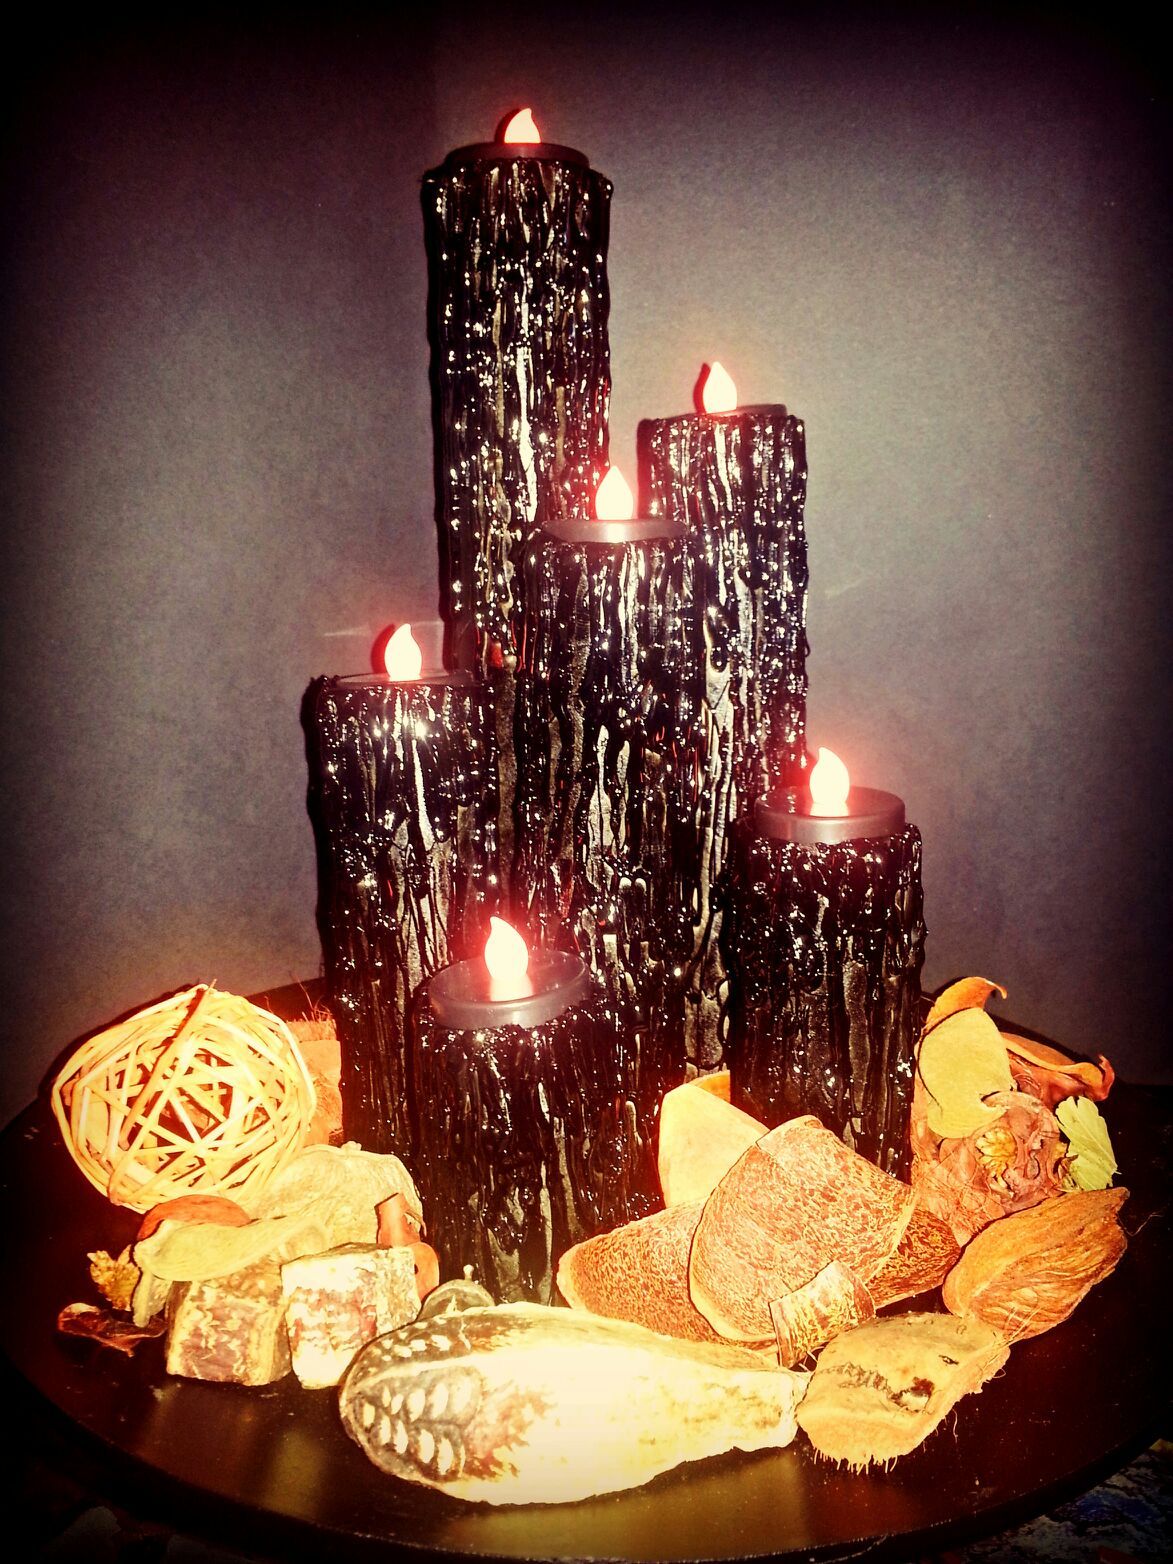
Drippy Halloween Candles


Yesterday, I made the 45 minute drive out to my sister-in-law, Denise's house to get my crafting mojo flowing. She has recently gotten me completely addicted to Pinterest, and we both pinned this particular craft project. So, we decided to go for it. It took a bit longer than I think either one of us originally thought it would take, not to mention a butt load more glue than we thought it would, but it turned out amazing. 

I won't lie and say I planned on blogging about our project and took lots of pictures as we went long because I didn't. I was more concerned with being crafty. HaHa! Denise was kind enough, though, to send me the few pictures she took along the way. So, I'll do my best to describe the steps we didn't take pictures of.

Here's what ya need:

-empty paper towel rolls
-empty toilet paper rolls
-masking tape
-glue gun
-LOTS of glue sticks...think like 2 bags or more!
-black spray paint
-card board to spray paint on
-card board to use as a base for your candles
-battery operated tea candle in black for each drippy candle you make


Step 1

Cut or tape the rolls to the height you want them to be. We found it easiest to group them how we wanted the finished product to look. By doing it this way, you know if you need to make more for it to look right or if some need to be taller, shorter, etc. Denise had more toilet paper rolls than paper towel rolls, so we ended up taping the toilet paper rolls together, then cutting them down to the height we wanted.


Step 2

Once you have them all the height you want, you need to make a "bowl" or "nest" for the tea lights to sit in. You don't want to glue them into the rolls because you need to be able to take them out to turn them off and on. 


I found it was easiest to get the tea light at the level you wanted by wrapping the masking tape around the bottom and setting it into the roll. 


Once I got it to the level I wanted inside the roll, I folded the tape down the outside of the roll so it would stay. I did this all the way around the top of each roll which ended up being about 4 pieces of tape per roll.

Step 3

Once you have all your "bowls" or "nests" made, it's time to glue! We had a small glue gun...I believe it's called the "cool shot mini", but I could be wrong. It takes the mini glue sticks is really all I know! :)


While you can make these candles with this glue gun...we obviously did...I don't recommend it! Because it's such a small glue gun and uses small glue sticks, we didn't get many lines of glue per stick. Also, the line of glue that came out was very small. We had to go over the same area several times to get the affect a larger glue gun would have only taken once to get. If you have this glue gun or one similar to it, you don't have to go out and get a new one, but be prepared to have sore fingers...you pull that trigger a LOT!!

All you do with the glue is draw lines down the sides of the rolls. We did a mixture of thick and thin lines. The more you do, the more realistic it will turn out in the end. 

Step 4

Once the glue has dried, you need to glue them down to your base. We cut a small circle out of card board for this. Arrange them how you want them to look and one by one, glue around the base with the hot glue. It get's tricky if you have them placed close together. You can hold the roll up and put the glue on before placing it down, then glue around it to make sure it's secure, though. After they're secure and the glue is dry, add more lines of glue so you don't see the circle around the base and it looks like the candle is melting into the base. Again, the more you do, the better it will look.


Step 5

Spray paint time!!! 

After all the glue is completely dry, grab your other piece of card board and go somewhere safe to spray paint. We went out to a patio that was well ventilated. Then spray away! The rolls will absorb the paint, so don't be surprised if you spray an area then come back to it a few minutes later and it looks like it has spots that are missing paint. 


Step 6

Wait...go do something else...watch a movie...go shopping...whatever you want. All that's left is to wait for the paint to dry. Once it's dry, put the tea lights in and you're done!! 


Wednesday, September 4, 2013

Ready...Set...Blog!


Hmmm...where to start?? Well, I'm a 26 year old woman who left everything and everyone I knew in Louisiana for love over 4 1/2 years ago. I decided to follow my boyfriend (now husband) to California after only dating for about 5 months. The Air Force transferred him, and I said, "Cool, I'm coming too!". Imagine having that conversation with your folks! Oh, and he was in Iraq when my Dad actually moved me out here. Yeah...Dad wasn't too thrilled with the whole plan. But, off we went! We packed my Mazda 3 only two days after my college graduation and headed West. I've never looked back. My husband is my rock, my confidant, my lover, my all. I can't imagine my life without him in it.


Life out here in Cali has been both good and bad. I love the area and all it has to offer. It seems like there's endless options for day trips, camping, shopping, shopping...did I mention shopping?? I LOVE to shop! As good as all that is, though, I'm very close to my family and the distance from Cali to Louisiana has been really hard. I'm closest to my Mom more than anyone. Next to my husband, she's my closest friend! I don't know how I got so lucky to have her as my Mom! I don't think I can go more than 2 or 3 days without talking to her either through text or a phone call.


While I've been out here in Cali, I've not been able to use the degree I earned in college. I have an accounting degree, but when I moved out here, there weren't any positions for entry-level accountants. To be honest, I was pretty cool with that! I don't mind being an administrative assistant, it's just not all that challenging. That brings me to blogging. I've started getting bored with what my job has to offer and I want an outlet for everything I have on my mind. 

Beauty, fashion, crafts, travel, being a military spouse, cooking, my list goes on and on. That's what this blog will be about...my randomness! HaHa!! Blogging world here I come! I have no clue what I'm doing...so, consider yourselves warned!